Friday 14 June 2013

Fitness Friday - The Core of the Matter Edition - Part 3


After a successful part 1 and 2 as seen by our readers, CL from FitnessLab concludes the Edition with a part that is must read for al.. Enjoy and Stay Dirty!

The Core of the Matter pt 3

In our last addition to core training for cycling, we put the last piece of the puzzle into our equation and that is the scapula-humeral joint stabilization. This articulation is made up of the scapula, shoulder girdle and shoulder joint. Together these work together to stabilize the upper portion of our “core” providing a stable platform for our arms to work from.
Even though our arms don’t actually contribute a whole lot to cycling propulsion and power output they do lend themselves to support our upper body maintaining a strong posture when we are cycling. As we know, when our posture/form deteriorates, our performance is sure enough the next thing to go. Therefore we need to train our shoulder stabilizers so that the arms maintain the posture ensuring optimal performance.

Our shoulder stabilizers are comprised of a few muscles namely; the rotator cuff, Serratus Anterior and lower Trapezium. Despite the strong collection of muscles aiding in shoulder stabilization, the shoulder joint is still quite an unstable junction and susceptible to injuries mainly impingement. Impingement injuries are a rarity in cycling but due to the hunched over posture encouraged through cycling, exercises that counter this posture are needed to ensure muscular balance in the body.  So even though these exercises may have no direct influence on our cycle performance, they will help maintain our muscle balance between front and back thus preventing possible injury later done the line. We can refer to this as prehab training.

There are three exercises that we will focus on when training the shoulder stabilizers. External rotation, Scapular doming and wall slides. These can be performed prior to your strength workout and are great to warm the shoulder joint up if the focus is upper body.
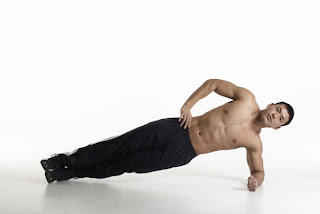
The external rotation is an exercise we use to help counter balance the shoulder joint muscles as internal rotation is the prominent position the shoulder finds itself when holding the handlebars. So to prevent dominance of theses muscles we must train their counter movers (antagonists) to maintain shoulder health. This is our prehab training preventing future imbalances or injuries.

External Shoulder Rotation

 The scapular doming exercise not only encourages upper back mobility through the hollowing and rounding of the thoracic vertebra but it trains the Serratus anterior muscles to keep the scapula fastened to the ribcage.  If the scapula is allowed to lift away from the ribcage, it upsets the surrounding muscles’s length and tension with their corresponding bones and joints. This will result in a dominance of other muscles around the shoulder joint which compromises the shoulder joint’s stability and mobility.

Scapular Doming

Lastly, our wall slide exercise combines both training of the external rotators of the shoulder and the Serratus anterior. If performed correctly it also minimises the use of the upper Trapizuim muscle which often overrides weaker and untrained shoulder and upper back stabilizing muscles. Our neck pain that we get from cycling is often related to stiff and tight upper traps. Minimising the involvement f these muscles during cycling goes a long way to ensuring a strong posture and improved performance.

Wall Sliding

Each exercise can be performed twice with 15-20 reps with 100% correct form.


Happy riding!


Friday 24 May 2013

It’s not a sprint it’s a marathon – What to pack on a long ride!


The Long Ride Ahead!

A while ago on Dirt Worx News we posted 20 items that should be considered to take with you when you are going for a longer than usual ride. In the news that day we only listed them, but here we are going to break them down and tell you why these items are important!

When going on a long ride it’s always important to think what are the essentials to take with. However, this is also difficult as the last thing you want on your back is more weight, which will just make the ride uncomfortable, and if you are going to be in the saddle for more than 5 hours, it’s the last thing you want to think about. So where do we begin?

Back Pack/Hydration Pack -


A good spacious comfortable hydration pack is where this starts. There are plenty out there and some I would highlight more than others but the main thing to look at is comfortability, pocket space, obviously a good hydration system and again good packing space. Ones that often come up are the Camelbak Rogue or mule (holding 2L and 3L respectively). The great thing about these two is the space and how compact they are,  as well as comfortability that they have while on those long rides.
Ok now we have our “back pack” in hand, what else should you consider?

Spare Patch Kit –


Why would I need this if I have tubes? Simple they weigh nothing, take up no space at all and when you run out of tunes on those days which you think why am I riding, they can save you. Don’t take them for granted.

Tire Pump –


The world of the CO2 bomb is here for quite sometime now and yes, these things are awesome, but it also means you have to carry a few with you. On the other hand a reliable small compact (preferably double action) tire pump will never run out and will always be by your side. Clip it on the bike and off you go!

Multi-tool - 


Just as Bear Grills has his trusty flint and super-never-break-or-be-blunt knife; the bikers multi-tool is essential for any ride. These tools will literally save your life in most instances. Always spend a bit of extra cash on the good ones. Make sure it has all the relevant allen-key heads, both screwdriver types, built-in chain tool, wire cutters, pliers and tools for spokes – a leatherman can work but you will need another tool for the chain and spokes, so just don’t and get a bike tool!

Tire Levers –


The ever faithful tire lever is here to stay, no matter what you will use these, and be grateful you took them. They are light and take up no space, so no excuses

Shock Pump –


A little bit of a bulky tool to take along, and some would say not necessary, but it never hurts to be prepared to pump up the shocks when needed or in case of a slow leak this will help. It is also nice to fine tune the shocks for the long ride ahead.

Chain Lube –


Yes generally you need to lube your chain before the ride to allow it to dry properly etc etc. but you 
also need to always pack it just in case of those muddy rides, or dry sandy and dusty rides. A tip that you can use is, take a rubber band and wrap it around a small cloth around the bottle toclean the chain and dry off excess lube.

Sun screen and Lip Balm - 


In our environment of a mountain biker, the sun can be our friend or enemy, never the less always be prepared. pack a good lip balm and sun screen to protect you not only from the sun but other elements as well. After-all, it is not nice to be burnt to a crisp after an awesome long ride.

Phone –


Probably one of the most important accessories to take along with you. This is essential. With modern smart phones these days, it will help with not only calling in case of an emergency but also for GPS and other useful functions. Remember to have an “In case of an Emergency” contact list on the phone.

Packable Rain Jacket –


The elements can be friend or foe depending on how you look at it, but a rain jacket is an essential part of the equipment to take with. There are many different types of foldable brands out there. Look for a light yet sturdy and preferably wind proof one out there. Some to look at are First Ascent, Cape Storm, Atomic, Adidas.

First Aid Kit –


One should never leave home without one of these. They are generally light and compact enough to carry. A good one includes: bandages, gauze, disinfecting wipes and tweezers. A basic understanding of first aid should also be known.

Derailleur Hanger –


What is this? I don’t need this my bike is strong enough. How many people have said this and have come horribly short. A broken hanger can mean the end of your ride and if you have been going for a while and this happens, it’s a long walk back my friend. They are light and small to fit in easily into your pack…so pack it!

Extra links with a master link –


It goes without saying – if you have a chain you are always worried about that break. Pack extra links with a master link. Having this on board will let you carry on riding if you have any broken or bent links as well as full use of all gears.

Chainring Bolt –


These can sometimes sheer off or  rattle loose. Packing one will allow you to carry on riding with all rings intact

Energy drinks and snacks –


Always an essential item to take on a ling ride. With heat and possible dehydration setting in or hunger, have a pack of energy chews, snack bar or something to keep you going. If you have a bottle cage (most bikes do) have an extra bottle with some energy juice or rehydrate  to keep you going.

Zip ties –


The cyclists duct tape. These babies will come in handy not matter where you are and are useful for a 101 things. Carry a few with you and you will be surprised what they can do.

Spare cleats –


I found out first hand that these come in handy. Smashing your cleat on a rock or bending them does happen, so having a spare is always useful. Keep the bolts threaded in so you don’t lose them

Money –


Always needed, never enough. Well for your ride you don’t need millions. Keep it on you in case of emergency situations. Besides being used for the post beer, it can also be used a tire-boot (it’s a pretty cool trick check it out here)

Small but bright light –


Light the way the as they say. A light comes in handy always and carrying a small but bright one is exactly perfect for your ride. There are a lot of good ones out there so be sure to check with your local bike ship to get the right one.

This list is a combination of tools, essentials and general items which should be looked at. Remember when packing for a long ride, think of the essentials and then customise what else you would like. Things to remember are usefulness, weight and space.

Enjoy the long rides and Stay Dirty!


Fitness Friday - The Core of the Matter Edition - Part 2


The Core of the Matter pt 2:


In the previous Fitness Friday article, core training was addressed and we looked at the midsection of the core (deep abdominals like the transverse abdominus and the more superficial muscles of the obliques). In this article we are going to address the hip muscles that contribute to core stabilisation as well as exercises that train them.

Hip stabilisation during cycling is not as important to overall training as the muscles involved aren’t really required, because we are elevated off the ground when sitting on our bike. The main hip stabiliser muscle, Glute Medius, fires when we are in single leg standing/motion e.g jogging. The muscle’s main function is to keep the pelvis level/aligned during our gait. Improper firing of these muscles would encourage a drop in hip level creating an unstable platform for our legs to work from. Very often, knee related injuries such as ITB and runners knee stem from weak a Glute Medius. As we can see, the hip stabilisers are vital during running (single leg stability) sports but their importance during cycling won’t be seen as essential. However, this does not mean we should neglect them and avoid training them. Strength training exercises can be tailored to include activating the hip stabiliser so that they are trained indirectly and not as the primary muscle. For example, a conventional squat movement can be modified into a single leg squat which will include the hip stabilisers. So not only are we training our quad and glute muscles which are pivotal in cycling performance, we can recruit the Glute Medius muscle as well as challenging our nervous system to a greater extent as single leg training is far more taxing then standard double leg movements. This is what we call a “bang for our buck” exercise!

The other hip stabilising muscles which have more involvement during our pedal stroke are the adductor muscles (inner thigh/groin). These muscles’ main function is to bring the upper limb (thigh) back to the centre once it has been moved away from the midline of the body E.g. When doing a jumping jacks/star jumps; you bring your legs back to the middle. Additionally the adductor muscles assist in hip extension which occurs during the downward stroke (push) of cycling.  So not only do they assist in pedal performance but they also contribute to hip stabilisation, thus they need to be incorporated into your training regime. The adductor muscles will also be trained during the single leg squat but another exercise you can use is the lateral lunge.  Not only will it target the adductor muscles but the quads and glutes are also involved when performed correctly.

In both pictures, the demonstrator gets their thigh as close to parallel to the floor so as to optimize the full range of motion of the joint and muscles surrounding it. This end position is very similar to top of your pedal stroke before you start to push down. Therefore to ensure your strength exercises have maximum carry over to your cycling, go through the full range of motion. Partial squats or half squats will only give you half performance on race day.

Single Leg Squat
Lateral Lunge

Perform each exercise twice a week at 3-4 sets x 15-20 reps per leg. Start with just body weight and ensure correct technique (neutral posture, avoid too much knee over toes and keep a strong chest). Once that becomes too easy, begin to add weight to ensure progression and prevent muscle staleness.

Happy Training!

CL

Friday 10 May 2013

Fitness Friday - The Core of Matter Edition!


It's Friday again and that means the week has left us, we can put our work shoes away and put on our bike shoes. Here is the Core Edition Part 1


Thanks again to CL for his monthly input. Be sure to follow FitnessLab on twitter @Fitnesslab and on facebook. To find out more information on training and just being in good shape contact FitnessLab

The Core of the matter:
In a three part article, I will be dissecting the so-called core muscles that give us our stable foundation to work from. The first part is going to tackle the “abdominal” core region of the body and then in the following articles I will discuss the hips and shoulders in two separate articles.
The core muscles provide our body with a stable platform upon which to perform movements and actions related to everyday living and/or sporting activities. The more taxing the movement/action on the body (nervous system) the more we require a stronger core to assist us. Sports that are performed under unstable conditions, such as canoeing, ice hockey and surfing, require greater assistance from the stabilising muscles of the body than compared to land based bipedal sports like road running. It is therefore important we condition our body to handle these “stressors” in order for us to perform the movements more efficiently and effectively.

Now, just because one sport has less physical demands than another, doesn’t mean we train our body just enough to handle that sporting demands. No matter how challenging the sport or action, we should always strive to train our body past its potential. Our core doesn’t stop working at the end of a singletrack, we need it firing optimally everyday beyond our 3 hour bike ride. So let’s look a little closer at the mid section of the core and at the muscles which stabilise the trunk.

Our primary deep stabilising muscles are the Transverse abdominus and Multifidus. These two muscles work like a corset to keep the torso tight and rigid and almost act like the first layer of stabilisation during any movement in any direction. These need to fire 100% of the time and must have a high endurance capability. Superficially, the Rectus Abdominus, Obliques, Erector Spinae and Quadrates Lumborum assist in keeping the truck erect and rigid. Additionally, the diaphragm and Thoracolumbar fascia and pelvic floor muscle combine to ensure rigidity posteriorly, superiorly and inferiorly.  In all most like a box effect of our core muscles give our body its “core” stabilisation to perform movements and actions.

So as you can see, there is quite a team of muscles working around our midsection to ensure we have a solid platform to work off. Merely doing crunches and their variations will not provide us with a conditioned midsection. If anything, loads of crunches could actually be detrimental to training our core muscles. These muscles need to be trained in various different planes and according to the way we move in our sport and everyday living. Life and sport never hits us from straight on!

So, what trunk exercises can we incorporate into our training program for our cycling?
Our standard front plank is a great exercise to target both front and back core muscles but instead of being on our elbows, position yourself on your hands (similar to a full push-up position). In this position, we incorporate our shoulder and arms in a similar position of that to holding on to our handlebars when cycling.

Front Plank
 The side plank exercise targets the Obliques and Quadratus lumborum and focuses on keeping the body, specifically the trunk, stable while in a frontal plane with the aim to avoid the trunk from flexing laterally. As both the internal and external obliques have influence on the pelvis and ribcage, keeping the distance between the two steady will prevent unwanted hip or ribcage sway. Too much sway in the trunk causes unwanted loss in energy as the body attempts to overcome the instability in the trunk.
Lastly, I would incorporate a glute bridge march in my abdominal core training program. In this exercise, you lie on your back, with your knees bent and hips off the floor. From this position lift one leg off the floor but keep the knee at a 90 degree angle. Thus you have one leg supporting the body which primes, the lower lumbar muscles and obliques to stabilise the hips while holding this position. Hold this position for 10 seconds and then change legs. This way, we challenge each side of the body, especially the lower core areas, much like you would with each pedal stroke.

Glute Bridge March
For each of these exercises I would perform 2 sets of 30s (beginner) 45-90s (advanced) except for the glute bridge march where I would do 2 sets of 10 x 10s (holds)


In each of these diagrams, note how the demonstrators maintain a neutral spine/posture. There is no dropping of the hips in any position. This way we ensure we are conditioning the body in its most stable position and not overdeveloping one side over the other. It is critical that your primary focus is to find that neutral spinal curvature and it maintain it while performing each exercise. This is best done by using a mirror to give you feedback allowing you to make minor adjustments if need be.

These exercises are the basis of your foundation for developing the midsection of the “core”

Have a great week and happy riding.


CL

Friday 26 April 2013

The Saddle - Friend or Enemy?


Friend or Enemy?
The saddle - probably one of the most important features on your bike. It is there to be your friend not your enemy. The reason behind this post, is that it has come to my attention that this is a serious issue. There are a lot of riders out there, including me, who has had the battle of choosing the right saddle. But if you don't know why you need to choose the right one, then you will most probably stick with what you got and that's that. So let's start there - Why is it so important to have the right saddle?

It's a pretty simple answer, so you don't hate cycling at the end of the day. Your saddle is a personal item, just like your shoes, it has to fit right for you. If your saddle is not right, you will end up hating that ride, which was suppose to be amazing but ended up being horrible just because the soft, cushy thing under your bum was wrong. Simple fact of the matter, a wrong saddle equals a horrible ride. 

But let's look more closely at what goes into a saddle decision and which models are better for what type of riding.

These are some key features that experts say you should look at when shopping for a saddle.
  • Shape - The best to do here is to measure the width of your sit bones, as they are called, which will give you a good starting point. With regards to the length, think about your spine flexibility
  • Rail composition - The longer the rail the more comfortable, so what does that mean? Check out the flexibility of the rails, this will give you an idea on how comfortable the saddle will be
  • Shell or base material - the shell is generally made from nylon and is a hard cut-out mould. Some saddles use a base material of carbon, for the affect of weight and tweak flex characteristics. The shell will determine the flexibility of the saddle under the riders weight
  • Cutout - cut-out plays a major role with saddles, and in-turn works together with the shell design. Over the years more and more riders are choosing a saddle with a cut-out hole in the nose of the saddle. The reason is it shifts pressure away from the soft tissue and toward the ischial tuberosities, aka sitz bones. However some solid nose saddles still work best for some riders, especially those who  sit crooked on their bikes.
  • Padding - Ahhh the only thing that matters to some riders. The padding is usually made up of urethane foam and also consists of a polymer gel. Sometimes there is more than one material used and these are combined to give that squishy feel. However it should be remembered that more squishiness and padding does not mean more comfort. If your saddle is set up correctly and other factors are correct, it has been shown that the saddle can be harder too.
  • Channelled - it's important because it will relieve perineum pressure while maintaining a standard saddle base
  • Covering - this is more for look than feel, but there are different materials used, some with holes or raised dots to stop from sliding around and mountain bike saddles generally have rough and reinforced covering material covering on the corners for wear and tear
So what do the different models look like? Here are a few that are common in most different cycling disciplines, from road racing, track cycling to mountain biking and even casual riding


Road Racing 

Road saddle with center cutout to reduce pressure for the rider.  Long, narrow design is best suited for heavy pedaling and racing. | Photo © ryoichitanaka / flickr
heavy duty racing saddle. Designed for racing as it has the cut-out which helps
with the pressure on the sitz bones.  Photo © ryoichitanaka / flickr
Mountain Biking
Mountain bike saddle with medium padding, reinforced shell and a slightly downward slopping geometry. | Photo © Trek Bicycle Corporation
A typical mountain bike saddle. Generally stronger and wider than road saddle
with medium padding Photo © Trek Bicycle Corporation

General riding


Gel saddles are built with gel padding, which can be soft and comfortable for short rides. However, there isn't enough support for longer, more intense rides. | Photo © Brandon Kelly
Gel saddle with lycra covering. Gel is used for a more comfortable ride
and is found on many town riding bikes Photo © Brandon Kelly

Wide, cushy saddle found on beach cruisers and other leisure bicycles.  Designed for maximum comfort, upright seating position. | Photo © UHLMAN / flickr
A cruiser saddle, also great for commuting riding and for sitting up right
Photo © UHLMAN / flickr
Dual cushion saddle that distributes weight around the sit bones. The lack of a nose can also relieve pressure from the rider's perineum. | Photo © Hobson Associates, Inc.
Dual-cushion saddle. These are designed to relieve a lot of pressure on the sit bones
as well as the short nose. Photo © Hobson Associates, Inc.

There are also gender specific saddles. Generally woman saddles are shorter in the front and a little wider at the back to accommodate a woman's anatomy, as tests have shown that it can be extremely painful for a woman cyclist in that area in the front while the mens saddles are longer and narrower. 

Terry Ti Butterfly Saddle for Women
Terry has been focusing on women's saddles for years
Photo ©Adventurecycling
More common mens mountain bike saddle

Overall, choosing a saddle is very difficult, as if you wanted to try them all you would have to sit on each one, on your bike, and not many people I know have time for that. But if you take the above as a good guideline and speak with your bike shop, most will be able to help you. As I said in the beginning, you bike saddle needs to be your friend and not your enemy. There are some fantastic brands out there, who have taken time and effort to make sure your rear-end is well taken care of.

For some more reading and in depth information here are some nice links to check out to learn more ebicyclesBikeradar has a nice write up on womens saddles and a nice Q & A for if you are sitting comfortably 

Go out there, find the right one for you and make riding feel comfortable again

Ouch!
 Stay Dirty!

Friday 19 April 2013

Fitness Friday!

As I mentioned before, bi-monthly there will be a Fitness Friday post from CL, who is a sports scientist as well as a personal trainer. CL currently owns FitnessLab, a private gym, which focuses on the right kind of training going forward.


In Fitness Friday sessions, there will be discussion on everything, from stretching right, to training the right way for the race ahead, to eating right. You can follow him on twitter @Fitnesslab or on the Facebook 

So let's get started with some stretching!

The Art of Foam Rolling:

With many hours spent on the bike climbing those unforgiving hills and putting the hammer down as we near the finish, our muscles and joints take quite a beating. Recovering from a day of cycling is very important to ensure that we are able to get back on that bike the next day and compete at the same levels. Now, ideally a full body massage would serve the purpose to ready our body for another day of tough cycling but having our own massage therapist is very pricey and improbable. However, the foam roller is the next best thing to a massage, in fact it is a form of massage but there are no scented oils or calming music in the background. This form of massage is self inflicted pain that makes you wonder if this is actually going to help and whether enduring stiffness the next day is a better option.

Foam rolling helps with self - myofascial release which is medical terminology for “helping release the tightness within muscles”. Very much like a massage helps alleviate stiff joints and knotted muscles, foam rolling encourages soft pliable muscles and mobile joints. If our joints have sufficient mobility and our muscles are at optimal length and tension, our body as a system will function better resulting in a better sporting performance.

Most cyclists complain of lower back pain and thigh stiffness after a long day in the saddle. To lessen pain there are two rolling movements you can use to encourage circulation and delay muscle soreness.  The first movement has you lying on your lumbar part of your back and rolling back and forth. It is a small area to roll but is often the most affected by cycling due to the “hunched” over position causing stress and pain during long cycles.


Movement number two is for the quadriceps (thigh muscles). These muscles are prime movers during cycling and also tend to shorten due to the repetitive cycling action. By rolling them we ensure they stay at an optimal length allowing for maximal power output as well as remove any toxins built up from hours on the bike.


Make your rolling movements long and at a steady pace. Rolling the entire length of the muscles is essential to prevent stiffness and pain. You can do 10 rolls per muscle group to start out

Happy Rolling!


Wednesday 10 April 2013

The Simonsberg Classic 2013 - To Climb or not to Climb, that was the only question!


Sunday the 7th of April saw the start of the Penny Pinchers MTB series with the first leg being the Simonsberg Classic.


If you recall, the previous post was more about the right up on how to prepare and what lay ahead of us. In there we chatted about the so called climbing and how it can be called the toughest climbing race in SA. Well I am here to tell you that they were spot on.

Sunday morning CL and I started an early morning drive to the Venue, to get registered and ready for a day of what we thought was going to be tough but never as tough as it was in the end. Once registered, set up our bikes, got into the mind set of what lay ahead and off we went off to the start. While at the start, whihc is on an uphill and chatting to Super-Jane as she is known by her Super-hero name, also known just as jane between 8-5 normal working hours, we started to realise that, this was going to be a long day, a very long day!


Off went the hooter for the start and as in all races and in good fashion, the chirps started flying around the riders "this pace is great" said the last guy at the back as we all took our time to get going (one guy even managed to fall into the vineyards and decided to have an early taste of next seasons merlot, he was ok and got back to the riding) As the climbing started, you could see that it was going straight up the valley, which was not that steep at first and slowly but surely we started getting to the top. As the field started to seperate early on from the start, one could sense that it was going to be a very interesting ride.


Over the first hill and straight away into some fantastic single-track which was really great fun, narrow and a little harrowing at times, but exciting. After the single track, we headed down past the vineyards, whihc seemed great, but as everyone knows, with a downhill there has to come an uphill...Newton's Third Law in essence, and thats what exactly happened, straight up into the next hill!


For the next odd 20Km or so, this is how the race would pan out. Up and down intervals, with some great single track and some spectacular views. At the half way mark, the first waterpoint, which was a great relief, I over heard the one organiser comment save your energy towards the last section. Once hearing this I thought, well I heard that in the beginning, the first section was tough, so what does this mean.


Off we went from the half way mark, into a downhill, some flat and straight back into the climbing. I would like to point out that at this stage, we had done more climbing than I have even seen in a 45Km race and I had a feeling it was not going to get better. With watching some much fitter guys in front of me already walking some of the climb, we knew we were in for it for the last part.


As the Km's started to taper down and getting closer to the end, with only 10Km to go, I thought ok now I can go for it, I had just got over quite a tough climb, which was very tough, as it was paired with a very technical rock garden single track, and at this stage my mind could not focus on something like that.


After the rock garden single track, that is when the steepest climb I think I have ever seen approached us. With nothing else to do but get off, put your head down and push...and push I did. It never seemed to stop but finally it did, and I was welcomed by two great-danes who decided to just chill and enjoy the view.


After the big climb, we al thought it was over, it was home-straight to the finish, but once again we all got it wrong, the organisers through in one more long cruel hill just to finish us off, and if you weren't separated by now from men and boys, this would have done it. Eventually hitting the concrete section it was a nice and well welcomed straight to the finish, where I met up with CL, who took a very heavy bail, but still finished as always and Super-Jane, who smashed a lot of the field on a 26er I may add, and all smiling....the day had come to an end and with that so did the climbing


Next in the series is the Hottentots-Holland Classic, also looking to be a tough but very good challenge for all riders a like.

Play in the Mud and Stay Dirty!